All screenshots are copyrighted by LawLogix Group, Inc.
- Dashboard Tips
- All results in the Dashboard relate to Employees and I-9s currently assigned to your locations.
- Ensure the Dashboard options at the top of the page are selected as shown below.
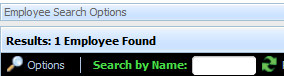
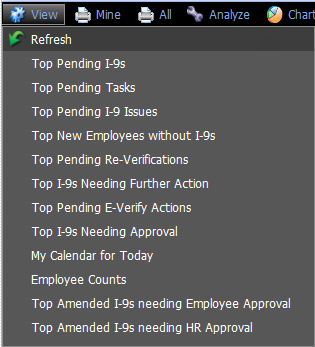
- "View" Menu on Dashboard.
- Each Dashboard can be changed to view other
- Color Dot Key:

- Green: More than 30 days left for the task to expire.
- Yellow: 30 days or less for the task to expire.
- Red: Task has expired.
- Dashboard Menu

- A: Once selected a menu will open with all dashboard viewing options and the option to refresh the dashboard
- Dashboards only refresh with this option at log in.
- B: Opens printable window with all results assigned to your HR specifically (if you are not responsible for I-9s in your location they will not show as your results).
- C: Opens printable window with all results in the dashboard.
- D: Directs you to I-9 Forms page with viewing options for that specific dashboard in order to view the details of that dashboard's results.
- E: Opens pie chart showing the division of red, yellow, and green dots in regards to that specific dashboard.
- A: Once selected a menu will open with all dashboard viewing options and the option to refresh the dashboard
- Dashboards Explained
- Top Pending I-9s (should be top left main Dashboard).
- Shows incomplete I-9s - either Section 1 or 2 not being signed or the I-9 not being "Mark Completed."
- To Correct: Click on the date created, and complete the I-9 through approval and E-Verify Case closure.
- Top I-9s Needing Further Action (should be top right main Dashboard)
- Shows I-9s having used receipts in lieu of original documents. These I-9s are only valid for 90 days and must be updated as soon as the employee receives their original documents.
- To Correct: Click on the date created, click on the green "Update I-9 Receipt(s)" button - this will transfer you to Section 2 of the I-9, uncheck the receipt option in Section 2, re-sign Section 2, approve the I-9, and close the E-Verify Case.
- Top Pending Re-Verifications (should be bottom left main Dashboard)
- Shows expired, or soon to be expired, I-9s which require re-verification of the work authorization.
- To Correct: Click on the date created, scroll down to the bottom of the I-9 Overview Page, add a Section 3 Re-Verification Entry, sign the entry, and approve the entry.
- If the employee's updated work authorization documents involve an I-94 and support documents, select "Unexpired Foreign Passport with attached I-94 or I-94A Form" and then enter the I-94 # and their new expiration date on the Section 3 entry (not the passport information).
- Top I-9s Needing Approval (should be bottom right main Dashboard)
- Shows all I-9s that have been "Mark Completed" yet not "Mark Approved" and subsequently sent to E-Verify.
- To Correct: Select on the date created. Click on the green "Mark Approved" button, confirm the approval on the next page, and complete the E-Verify Case.
- Top Pending I-9 Issues
- Shows any issues with the I-9 including wrong document numbers, unapproved Section 3 Entries, expired work authorization, missing information, mismatching SSNs between Section 1 and Section 2 and unsigned sections.
- To Correct: Click on the date created, click on the Issues tab in the top horizontal menu of the I-9 Overview, review the listed Issues, fix the issues with the I-9 (if the I-9 is approved email the needed changes to the I-9 Administrator in HR), click "Check I-9" for the system to review the I-9 for issues, and exit once there are no more issues.
- If the "Check I-9" button cannot be found, ensure that all the panels are showing. On the I-9 Overview page, scroll your mouse over the sideways "View" bar and select "All Panels." See "How To: View All Panels in the I-9 Overview Page."
- If the "Check I-9" button cannot be found, ensure that all the panels are showing. On the I-9 Overview page, scroll your mouse over the sideways "View" bar and select "All Panels." See "How To: View All Panels in the I-9 Overview Page."
- Top New Employees Without I-9s
- Shows employee profiles without I-9s. This happens often when an I-9 is started but canceled. The initial information in Section 1 creates the employee profile, but if the I-9 is canceled the employee profile remains without an actual I-9 completed.
- To Correct: Make an appointment with the employee, click on the "Create I-9" link in the Dashboard, and create a new I-9.
- If the employee no longer works for FSU, terminate the employee in Guardian and add a Case Note detailing the reason an I-9 was never completed.
- If the employee never worked for FSU contact the I-9 Administrator in HR to correct the issue.
- Top Pending Tasks
- Shows same information as the "Tasks" page on the left vertical menu. It shows all pending tasks which require action.
- To Correct: Complete the task and then click on the Reminder Date and click "Mark Completed."
- Top Pending E-Verify Actions
- Shows same information as the "E-Verify" page on the left vertical menu. It shows all open E-Verify Cases
- To Correct: Click on the Date Created and close the E-Verify Case.
- My Calendar for Today
- If the Calendar in Guardian is used, appointments are shown in this Dashboard.
- Employee Counts
- Shows employee counts in the following statuses: Current, Terminated - Purgeable, and Terminated - Must Retain.
- Don't worry about the Amended I-9 Dashboards as those are monitored by the I-9 Administrator in HR.
- Top Pending I-9s (should be top left main Dashboard).